
아래 프로젝트는 Timer.publish를 이용한 타이머를 구현하여 시간이 끝나게 되면 아두이노 LED를 CoreBluetooth를 이용하여 키는 것 입니다.
아래는 CoreBluetooth 코드입니다.
import CoreBluetooth
import SwiftUI

@Observable class Bluetooth: NSObject, CBCentralManagerDelegate, CBPeripheralDelegate {

    var peripherals: Set<CBPeripheral> = Set<CBPeripheral>()
    var values: String = .init()
    var connected = false

    weak var writeCharacteristic: CBCharacteristic? // 데이터를 주변기기에 보내기 위한 characcteristic을 저장하는 변수

    // 데이터를 주변기기에 보내는 type을 설정한다. withResponse는 데이터를 보내면 이에 대한 답장이 오는 경우, withoutResponse는 데이터를 보내도 답장이 오지 않는 경우
    private var writeType: CBCharacteristicWriteType = .withoutResponse

    var centralManager : CBCentralManager! // centralManager 객체 만들기

    var connectedPeripheral : CBPeripheral? // 연결된 아두이노 객체

    var serviceUUID = CBUUID(string: "FFE0") // 아래에 있는 128비트짜리 uuid를 사용하면 모듈을 못찾는다.

    //characteristicUUID는 serviceUUID에 포함되어 있다. 이를 이용하여 데이터를 송수신한다. FFE0 서비스가 갖고있는 FFE1로 설정한다.
    var characteristicUUID = CBUUID(string: "FFE1")

    public override init() {
        super.init()
        print("초기화")
        self.centralManager = CBCentralManager.init(delegate: self, queue: nil, options: nil) // 1. centralManager 객체를 초기화 시킨다.
    }
    // central manager를 만들때 central manager는 이 메서드를 부른다.
    // centralManagerDidUpdateState 함수는 delegate한테 central manager'의 상태가 변했다고 알려주는데
    // 아래와 같은 경우는 init()에서 centralManager가 CBCentralManager.init(...)을 실행시켜서 초기화 시킴으로 상태가 변했으므로 이 함수를 실행시킨다.
    // 저전력 블루투스가 지원되고 central 기기에서 쓰일수 있도록 반드시 구현해야한다.
    func centralManagerDidUpdateState(_ central: CBCentralManager) {
        print("만들어졌다")
        switch central.state {
        case .unknown:
            print("unknown")
        case .resetting:
            print("resetting")
        case .unsupported:
            print("unsupported")
        case .unauthorized:
            print("unauthorized")
        case .poweredOff:
            print("powered off")
        case .poweredOn:
            print("powered on")
//            self.centralManager.scanForPeripherals(withServices: nil, options: nil)
            self.centralManager.scanForPeripherals(withServices: [serviceUUID])
        @unknown default:
            fatalError()
        }
        connectedPeripheral = nil
    }
    func startScan(){ // 2. 주변기기를 스캔
        guard centralManager.state == .poweredOn else {return}
        // [serviceUUID]만 갖고있는 기기만 검색
        print("주변기기 스캔시작")
        centralManager.scanForPeripherals(withServices: [serviceUUID], options: nil)
    }
    func stopScan() {
        centralManager.stopScan()
    }

    // central manager가 peripheral를 발견할 때마다 delegate 객체의 메서드를 호출 // RSSI: 신호강도
    func centralManager(_ central: CBCentralManager, didDiscover peripheral: CBPeripheral, advertisementData: [String : Any], rssi RSSI: NSNumber) {
        print("발견")
        peripherals.insert(peripheral)
        centralManager.connect(peripheral)
    }

    // 기기가 연결되면 호출되는 delegate 메서드다.
    func centralManager(_ central: CBCentralManager, didConnect peripheral: CBPeripheral) {
        peripheral.delegate = self // 5. 연결되면 주변기기 대리자 만들기
        connectedPeripheral = peripheral

        // peripheral의 Service들을 검색한다. 파라미터를 nil으로 설정하면 Peripheral의 모든 service를 검색한다.
        peripheral.discoverServices([serviceUUID])
        if peripheral.name == "YourNewName" {
            connected = true
        }
        print([serviceUUID])
        print("연결 성공")
    }

    func centralManager(_ central: CBCentralManager, didDisconnectPeripheral peripheral: CBPeripheral, error: Error?) {
        if peripheral.name == "YourNewName" {
            connected = false
        }
    }

    func peripheral(_ peripheral: CBPeripheral, didDiscoverServices error: Error?) {
        for service in peripheral.services! {
            peripheral.discoverCharacteristics([characteristicUUID], for: service)
        }
    }

    func peripheral(_ peripheral: CBPeripheral, didDiscoverCharacteristicsFor service: CBService, error: Error?) {
        for characteristic in service.characteristics!{
            if characteristic.uuid == characteristicUUID {
                peripheral.setNotifyValue(true, for: characteristic) // 10. 구독한다.

                writeCharacteristic = characteristic // writeCharacteristic:  주변기기에 보내기 위한 특성을 저장하는 변수

                writeType = characteristic.properties.contains(.write) ? .withResponse : .withoutResponse // 9.

                connected = true
            }
        }
    }

    func sendMessageToDevice(_ message: String){ // -> Bool{
        // 만약 블루투스가 연결되지 않았다면 보내면 안된다.
        if connectedPeripheral?.state == .connected {
            if let data = message.data(using: String.Encoding.utf8), let charater = writeCharacteristic {
                connectedPeripheral!.writeValue(data, for: charater, type: writeType) // writeCharacteristic은 주변기기에 보내기 위한 특성
            }
        }
    }

}
타이머를 구현하는 클래스
다음은 타이머를 구현한 Timer 클래스입니다.
기본적인 변수들은 다음과 같이 설정하였습니다.
bluetooth
: 아두이노와 통신하기 위한 클래스 인스턴스입니다
timeRemaining
: 시간이 초기화 됐을 때 사용되는 값입니다.
showAlert
: 타이머가 끝나면 사용자한테 알림을 보여줄 때 사용되는 트리거 입니다.
isStarted
: 타이머의 시작 여부를 담고 있습니다. true 면 타이머가 동작 중이고 fasle 면 타이머가 멈춰있는 pause상태를 의미합니다.
initialized
: 타이머를 처음 시작했을 때 여부를 의미하며 false 면 아직 타이머가 시작하지 않은 상태를 의미하고 true 면 타이머가 동작 중을 의미합니다.
timer
: AnyCancellable로 타이머에 사용될 수 있는 Comine에서 제공하는 Publisher입니다.
hour, minute, second
: 사용자가 타이머로 처음 설정한 값이 들어있으며 initalize 함수에서 타이머 설정에 값이 비어있는지 여부 또한 판별하는데 사용됩니다.
@Observable
class TimeManager {

    var bluetooth: Bluetooth = Bluetooth()

    // Set the initial time to 0 seconds
    var timeRemaining = 0

    // A boolean used to show an alert when the time runs out
    var showAlert = false

    // A boolean used to pause the timer
    var isStarted = false

    var initalized = false

    // Publisher from Combine used for the timer
    var timer: AnyCancellable?

    var hour: Int = 0

    var minute: Int = 0

    var second: Int = 0
다음은 initalize 함수로 타이머에 설정한 값이 유효한지 확인 후 아두이노의 불을 끄는 "f" 를 전송하고 남은 잔여 시간을 초(second)로 만들어 timeRemaining 에 담습니다.
func initalize() {
    if hour != 0 || minute != 0 || second != 0 {
        bluetooth.sendMessageToDevice("f")
        timeRemaining = (hour*3600) + (minute*60) + second
        startTimer()
    }
}
다음은 startTimer 함수로 타이머의 시작을 알리는 isStarted 를 true로 설정하고 초기 시작을 true 로 설정합니다.
isStarted와 initalized를 나눈 이유는 initalized는 완전 처음 타이머를 시작했을 때의 여부를 확인하기 위해서 사용되며 isStarted는 재생 여부 즉 pause와 resume 동작을 수행하기 위해서 사용되기 때문에 나눕니다.
이후 Timer.publish(every: 1, on: .main, in: .common) 을 사용하여 1초마다 메인스레드에서 타이머를 작동시킵니다. .autoconnect() 메서드를 사용하여 publisher와 자동으로 연결하는 프로세스를 자동화합니다. 이후 sink를 사용하여 타이머에 의해 1초마다 발생하는 이벤트에대해 남아있는 잔여 시간을 1초씩 줄이거나 시간이 다됐을 때 타이머를 끝내는 작업을 수행합니다.
타이머를 끝내는 작업을 수행할 때 아두이노 LED를 켜기 위한 "o" 를 블루투스 인스턴스를 이용하여 전송합니다.
func startTimer() {
    isStarted = true
    initalized = true
    timer = Timer.publish(every: 1, on: .main, in: .common).autoconnect().sink { _ in
        if self.timeRemaining > 0 {
            self.timeRemaining -= 1
        } else {
            self.showAlert = true
            self.isStarted = false
            self.initalized = false
            self.timer?.cancel()
            self.bluetooth.sendMessageToDevice("o")
        }
    }
}
다음은 cancelTimer 함수로 타이머를 실행 도중에 종료하는 함수입니다. 초기 실행 여부를 설정하는 initalized 를 false로 만들고 isStarted 또한 false로 설정합니다
func cancelTimer() {
    timer?.cancel()
    isStarted = false
    initalized = false
}
다음은 pauseOrResumeTime 함수로 만일 타이머가 실행 중이고 잔여 시간이 남아있다면 타이머를 실행시킵니다, 만약 아니면 타이머를 중단합니다. (여기서 중단은 완전 종료가 아닙니다)
func pauseOrResumeTimer() {
    isStarted.toggle()
    if isStarted && timeRemaining > 0 {
        startTimer()
    } else {
        timer?.cancel()
    }
}
TimeManager 총 코드
import SwiftUI
import Combine

@Observable
class TimeManager {

    // used for communicate with HM10
    var bluetooth: Bluetooth = Bluetooth()

    // Set the initial time to 0 seconds
    var timeRemaining = 0

    // A boolean used to show an alert when the time runs out
    var showAlert = false

    // A boolean used to pause the timer
    var isStarted = false

    var initalized = false

    // Publisher from Combine used for the timer
    var timer: AnyCancellable?

    // set hour
    var hour: Int = 0

    // set minute
    var minute: Int = 0

    // set second
    var second: Int = 0


    func initalize() {
        if hour != 0 || minute != 0 || second != 0 {
            bluetooth.sendMessageToDevice("f")
            timeRemaining = (hour*3600) + (minute*60) + second
            startTimer()
        }
    }

    func startTimer() {
        isStarted = true
        initalized = true
        timer = Timer.publish(every: 1, on: .main, in: .common).autoconnect().sink { _ in
            if self.timeRemaining > 0 {
                self.timeRemaining -= 1
            } else {
                self.showAlert = true
                self.isStarted = false
                self.initalized = false
                self.timer?.cancel()
                self.bluetooth.sendMessageToDevice("o")
            }
        }
    }

    func cancelTimer() {
        timer?.cancel()
        isStarted = false
        initalized = false
    }

    func pauseOrResumeTimer() {
        isStarted.toggle()
        if isStarted && timeRemaining > 0 {
            startTimer()
        } else {
            timer?.cancel()
        }
    }
}타이머 시간을 설정할 수 있는 뷰
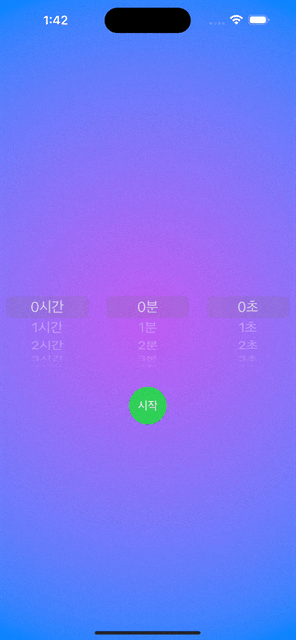
다음은 HourMinutePickerView로 타이머 시간을 설정할 수 있는 뷰입니다. @Observable를 활용하여 Picker 를 이용해 커스텀 Picker 뷰를 만듭니다. 또한 pickerStyle을 WheelPickerStyle() 로 설정하여 위아래로 드래그 하여 설정할 수 있도록 만듭니다.
struct HourMinutePickerView: View {
    @Environment(TimeManager.self) private var timeManager

    var body: some View {
        @Bindable var manager = timeManager
        HStack {
            VStack {
                Picker("시간",selection: $manager.hour) {
                    ForEach(0..<25) { value in
                        Text("\(value)시간")
                            .tag(value)
                    }
                }
                .pickerStyle(WheelPickerStyle())
            }
            VStack {
                Picker("시간",selection: $manager.minute) {
                    ForEach(0..<61) { value in
                        Text("\(value)분")
                            .tag(value)
                    }
                }
                .pickerStyle(WheelPickerStyle())
            }
            VStack {
                Picker("시간",selection: $manager.second) {
                    ForEach(0..<61) { value in
                        Text("\(value)초")
                            .tag(value)
                    }
                }
                .pickerStyle(WheelPickerStyle())
            }
        }
    }
}
다음은 초기 시작 버튼입니다. 초기 시작 버튼을 누르게 되면 설정한 시간이 0시간 0분 0초인지 여부를 확인 후 아니면 타이머가 시작되고 아니면 시작되지 않도록 동작합니다. 또한 초기 시작(initialized)이 true로 바뀌게 된다면 버튼은 사라져 타이머만 제어할 수 있도록 합니다.
if !timeManager.initalized {
    Button(action: {
        timeManager.initalize()
    }, label: {
        Text("시작")
    })
    .buttonStyle(CustomButtonStyle(buttonColor: .green))
}
다음 로직은 만일 타이머가 시작되었고 잔여 시간이 존재한다면 즉 설정된 시간이 0초 이상이라면 사용자한테 타이머의 상황을 보여주는 뷰를 보여줍니다.
if timeManager.initalized && timeManager.timeRemaining > 0 {
    ElapsedTimeView()
}
타이머 잔여 시간을 나타내는 뷰
ElapsedTimeView 의 구성은 다음과 같이 되어 있습니다. updateTimeRemaining 함수는 타이머에서 측정중인 남은 시간을 시간, 분, 초로 만들어 반환하는 로직입니다.
struct ElapsedTimeView: View {
    @Environment(TimeManager.self) var timeManager
    @State var remainingTime = ""

    func updateTimeRemaining(time: Int) -> String {
        var time = timeManager.timeRemaining
        let hour = time / 3600
        time = time % 3600
        let minute = time / 60
        time = time % 60
        let second = time
        return "\(hour)시간 \(minute)분 \(second)초"
    }

    var body: some View {
        Text("\(updateTimeRemaining(time: timeManager.timeRemaining))")
            .font(Font.system(.largeTitle, design: .monospaced))
            .onReceive(timeManager.timer.publisher, perform: { value in
                print("\(value) 값이 바뀌는중")
            })

        StartStopButtonView()
    }
}
타이머 실행 때 사용되는 중지, 재시작 버튼 뷰
다음은 StartStopButtonView로 타이머에 대한 중지와 재시작, 타이머를 취소하는 기능의 버튼이 구성되어 있습니다.
struct StartStopButtonView: View {
    @Environment(TimeManager.self) var timeManager

    var body: some View {
        HStack {
            Button(action: {
                timeManager.cancelTimer()
            }, label: {
                Text("취소")
                    .foregroundStyle(.white)
            })
            .buttonStyle(CustomButtonStyle(buttonColor: .gray))
            .padding()

            Spacer()

            Button(action: {
                    timeManager.pauseOrResumeTimer()
            }, label: {
                Text(timeManager.isStarted ? "중지" : "재시작")
                    .foregroundStyle(.white)
            })
            .buttonStyle(CustomButtonStyle(buttonColor: timeManager.isStarted ? .yellow : .green))
            .padding()

        }
    }
}추가 커스텀 버튼 스타일
struct CustomButtonStyle: ButtonStyle {

    let buttonColor: Color

    func makeBody(configuration: Configuration) -> some View {
        configuration.label
            .frame(width: 55, height: 55)
            .background(buttonColor)
            .clipShape(Circle())
            .scaleEffect(configuration.isPressed ? 0.8 : 1.0)

    }
}타이머 동작 영상
아두이노 총 코드
다음은 아두이노에서 블루투스 통신을 위한 코드이며 블루투스 모듈은 HM10 입니다.
#include <SoftwareSerial.h>

#define LED 13

SoftwareSerial HM10(BT_RXD, BT_TXD);  // RX핀(4번)은 HM10의 TX에 연결
                                      // TX핀(5번)은 HM10의 RX에 연결


void setup(){
  Serial.begin(9600);
  pinMode(LED, OUTPUT);    // LED를 출력으로 설정
  HM10.begin(9600);
}

void loop(){
  // Bluetooth 모듈에서 데이터를 읽어오기
  if (HM10.available()){
    char h = (char)HM10.read();
    Serial.println(h);
    if(h == 'o'){                   // 알파벳 소문자 'o'를 입력하면
      digitalWrite(LED, HIGH);     // LED가 점등됨
    }
    if(h == 'f'){                   // 알파벳 소문자 'f'를 입력하면
      digitalWrite(LED, LOW);       // LED가 소등됨
    }
  }

  // 시리얼 모니터를 통해 데이터를 읽어서 Bluetooth 모듈로 전송함
  if(Serial.available()){
    char h = (char)Serial.read();
    HM10.println(h);
  }
}
'SwiftUI' 카테고리의 다른 글
| Combine을 이용하여 값 변화에 대응하는 뷰 만들기 (0) | 2024.04.10 |
|---|---|
| Starting Vapor (Swift로 서버 만들기) (0) | 2024.04.09 |
| Timer 타이머 (0) | 2024.04.08 |
| JSON Data (0) | 2024.04.08 |
| Typelias (0) | 2024.04.08 |